Next: Bibliography Up: An Unreliable Guide to Previous: XKB Programs Contents
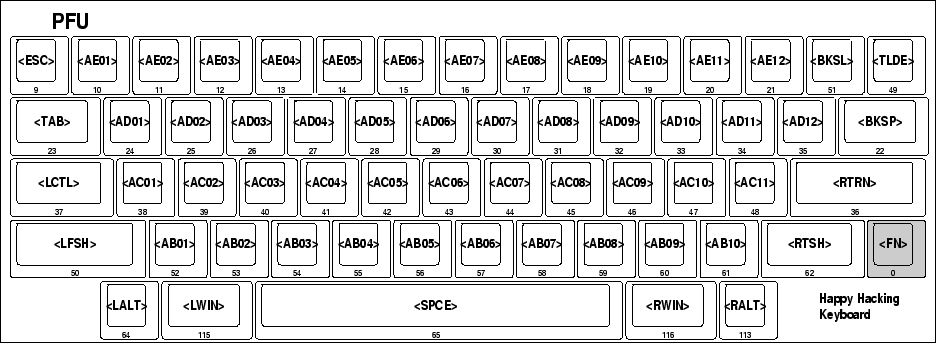
This section is the point, for me at least, of writing all the above. All I wanted to do was to get my keyboard working and producing useful symbols. Figure 3 is a picture of the HHK. As you can see, this is a pretty stripped-down keyboard, with no function or editing keys or keypad. Some of these keys are available in combination with a special Fn key.
The two keys with a diamond on them, either side of the space key can be set to produce a number of key codes. The possible combinations are shown in table 5. Two keys, Muhenken and Henken are used on Japanese keyboards to access extra groups. The other keys are the Alt and Windows keys familiar from normal PC keyboards.
Setting up for the HHK largely involves choosing what bits
of already existing XKB configuration can be pressed into
service.
The full set of configuration files can be found in
http://www.charvolant.org/~doug/xkb/hhk.tar.gz.
We might as well start with the physical shape of the keyboard. Since there is nothing even close to a suitable geometry file for the HHK, we'll need to roll our own.
A complication arises when the effects of the switches described in table 5 are considered. The solution I've adopted is to split the keyboard into two sections, an Alphanumeric section that covers most of the keyboard and a Space section that covers the row containing the alt, diamond and spacebar keys. Those switch settings that give a windows-like keyboard (switch 2 on) are labelled win1-4. Those switch settings that give a Japanese keyboard (switch 2 off) are labelled jp1-4. The default setting is win1.
Another complication is the Fn key, which has a position on the keyboard, but does not generate a scan code. I've used the symbolic name <FN> for this key, which doesn't seem to be used anywhere else.
The resulting file looks like this:
// SW = 100 Default layout with windows keys
default xkb_geometry "win1" {
    include "hhk(basic)"

    key.gap = 1;
    section "Space" {
        top = 86;
        left = 30;
        row {
            top = 1;
            keys {
                <LALT>,
                { <LWIN>, "DIAM" },
                { <SPCE>, "SPCE" },
                { <RWIN>, "DIAM" },
                <RALT>
            };
        };
    };
};
...
// Basic layout for non-switchable keys
partial hidden xkb_geometry "basic" {
...
    shape "NORM" { { [18, 18] }, { [2, 1], [14, 14] } };
    shape "DIAM" { { [28, 18] }, { [2, 1], [24, 14] } };
...
    text "PFULabel" { left = 16; top = 2; fontsize = 20; text = "PFU"; };
...
    section "Alphanumeric" {
...
        row {
            top = 20;
            keys {
                { <TAB>, "TABK" },
                <AD01>, <AD02>, <AD03>, <AD04>, <AD05>,
Figure 4 shows the resulting geometry.
Once we have this file, we can install it in the /usr/X11R6/lib/X11/xkb/geometry directory as hhk. We then need to add the following lines to /usr/X11R6/lib/X11/xkb/geometry.dir:
-d------ -------- hhk(win1)
-------- -------- hhk(win2)
-------- -------- hhk(win3)
-------- -------- hhk(win4)
-------- -------- hhk(jp1)
-------- -------- hhk(jp2)
-------- -------- hhk(jp3)
-------- -------- hhk(jp4)
The HHK acts as an ordinary -- just small and perfectly formed -- PC keyboard. As a result the xfree86 key codes can be used without modification.
The only key not present in the xfree86 key codes is the Fn key. However, this key does not generate a scan code and can be ignored.
The other complication is that the HHK has no numeric keypad. For the most part, this is not a problem. The only difficulty arises when the keypad keys are used for such complications as mouse movements.
The symbols present shouldn't cause any difficulty, since they should be keyboard independent. I want to use the various useful characters provided by the ISO9995-3 symbol map. However, the en_US(104) symbol map already thoughtfully provides these, with the R-Alt key as the group-shift key and the R-Windows key as the compose key.
To get a map of these symbols, use the command xkbprint -color -label symbols -lg 2 :0.0
The standard complete set of types works perfectly well with this keyboard. As does the standard complete set of compatibility maps. The only loss here is that the keypad can't be used for moving the mouse pointer; unfortunate, but hardly fatal.
Once all the appropriate files have been added, the rules files need to be changed to allow this keyboard to be used. To do this, we need to add another keyboard model: hhk. Once we have done this, we can add lines to the rules file that allow suitable geometry and other components to be added. The lines which need to be added are:
! model         =       keycodes        geometry
  hhk           =       xfree86         hhk
...
! model         layout  =       symbols
  hhk           us      =       us(pc104)
  hhk           en_US   =       en_US(pc104)
  hhk           *       =       en_US(pc104)+%l(%v)
The first line maps the HHK onto suitable keycodes and geometry. The other lines provide symbol maps for bog-standard US, US with all the interesting extra ISO9995-3 keys and for other national variants.
Doug Palmer 2004-10-11
![\includegraphics[width=\textwidth]{hhk.eps}](img9.png)